how to create golden ratio circles with adobe illustrator
The golden ratio is used by the graphic designer to make their designs better and more professional.
the designers use the golden ratio in logo design and create a strong composition, in the images below I will show you some of the popular logos that created by using the golden ratio.
in this tutorial, I will show you how to create the golden ratio using adobe illustrator.
1. Prepare the file
step 1
Open Adobe Illustrator and create a new file go to file>new.
step 2
create a document with 1000*1000 px.
2. create the golden ratio
step 1
using the rectangle tool(M) click on the document to create a rectangle with 10*10 px.
step 2
click on the document using the ellipse tool (L) to create a circle with 10*10 px.
step 3
drag the circle above the rectangle using the selection tool(v).
step 4
press on ctrl+a to select all the shapes on the document (the rectangle and the circle).
step 5
go to object>group to group the two shapes together.
step 6
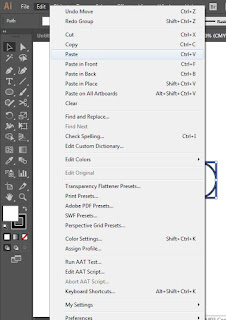
now we need to duplicate the shapes go to edit>copy then edit >paste.

step 7
move the second shape above the first shape.
step 8
press on ctrl+y to show the outlined version of the shapes.
step 9
hold alt (to duplicate the shape) and click on the second shape drag it and drop it beside the second shape.
step 10
click on the lift bottom corner and increase the size until you get the double size of the two squares.
step 11
press on ctrl+a rotate the shapes while holding shift(using shift while you rotating the shape lock the rotation to get the right angle ).
step 12
hold alt and click on the third shape drag it and drop it beside the second shape.
step 13
click on the lift bottom corner and increase the size until you get the same size as the vertical squares.
step 14
press on ctrl+a rotate the shapes from
horizontal to vertical while holding shift.
horizontal to vertical while holding shift.
step 15
hold alt and click on the fourth shape drag it and drop it beside the last shape.
step 16
click on the lift bottom corner and increase the size until you get the double size of the last shapes.
step 17
press on ctrl+a rotate the shapes while holding shift.
step 18
hold alt and click on the fourth shape drag it and drop it beside the last shape.
step 19
click on the lift bottom corner and increase the size until you get the double size of the last shapes then press on ctrl+a rotate the shapes while holding shift.
step 20
rebate the same previous step until you get 8 rectangle
the last result will be 8 rectangles same as the image below.
step 21
press on ctrl+y to show the color to the golden ratio that we made.
now we have our golden ratio completed
3. get the golden circle
step 1
press on ctrl+a to select the golden ratio.
.
.
step 2
go to object>ungroup to separate the shapes.
step 3
click on the circle while holding shift, now we have all of the circle selected.
step 4
press ctrl+c to copy the circles then press on ctrl+v to paste the circles.


No comments